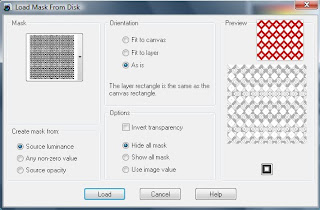
Masks are a quick way to create paper. Here are some for you to get started with. Soon, I will find time to create a tutorial to create your own for those just starting out.
1. Unzip and place content of folder in: My Documents/My PSP files/Masks
Once you have done the above...
2. Open up a transparent image (whatever size you want your paper).
3. Flood fill it with either a solid color or image of your choice.
4. Create a new raster layer and flood fill it with a different color or image of your choice.
5. Click on Layers/Load-Save Mask/Load Mask from disc...
6. Once you have chose a mask you want to use, select LOAD.

If you want to reverse the colors.....check the invert transparency.
Once you have done the above...
2. Open up a transparent image (whatever size you want your paper).
3. Flood fill it with either a solid color or image of your choice.
4. Create a new raster layer and flood fill it with a different color or image of your choice.
5. Click on Layers/Load-Save Mask/Load Mask from disc...
6. Once you have chose a mask you want to use, select LOAD.

If you want to reverse the colors.....check the invert transparency.


3 comments:
Thank you! Your blog post will be shared on CU Freebies Only Blog
on Thursday January 28th 2010!
Your Place to find Commercial Use Scrap Booking Freebies!
Thanks For Sharing your Time and Talent with us!
Merci beaucoup!
Ohhhh, thank you for this, I knew it had to be easy, so many people make so many papers from photos!
Now I can, if I only figure out how to make masks!!!
Seriously, thank you so much, you've just made my week, no more searching in vain for that perfect paper... :)
Post a Comment